|
Events and
Receipts 1. 600 mi First service
2. 3,000 mi oil change
3. 6,000 mi service
4. Forks serviced at
6K
5. New RK 525 chain, rear sprocket
replaced with AFAM 38T (included new carrier) -- front still has 14T...
6. Forks Serviced at 9K (5Nov2010)
FG 8851 2003.10.25 - left
(speedometer side)
FG 8851 2003.10.26 - right
7. Timing Belts replaced, front brake
system complete overhaul, oil change (18 March 2012)
8. 1 Mar 14, Cooling system flush and
Engine Ice replace plus Thermostat replace |
Full Torque Specs for 998s
Fasteners: Full
Torque specs in MS Excel:
Handy
Torque Specs for '04 998s:
| |
Ft-Lb |
N-m |
| Front Wheel Pinch
Bolts |
14 |
19 |
| Front Wheel Shaft
Nut |
46 |
63 |
| Front Brake
Caliper Retaining Bolts |
31.7 |
43 |
| Rear Wheel LH Nut |
115 |
156 |
| Rear Wheel RH Nut |
130 |
176 |
| Rear Swing arm
eccentric chain adjust pinch bolts (14mm bolt head) |
23 |
31 |
Oil quantity: 3.7L ~ 3.9Qrts
Oil change related torque values:
| |
Ft-Lb |
N-m |
| Oil Filter
Cartridge |
8 |
11 |
| Oil Drain Plug |
31 |
42 |
| Oil Screen
(mesh filter) |
31 |
42 |
| Oil Screen
Plug |
31 |
42 |
Front Wheel Installation:
You can use a dowel inserted from the left side to hold the wheel in
position. Put anti-seize or grease on the axle and then insert it from the
right side (of the bike). To avoid damaging the thin-walled axle, tap it in
gently and rotate it using the special tool from your Ducati tool kit. Once
it is in, line up the holes in the axle with the holes in the axle clamps so
that the through-holes allow screwdriver access to the compression valve
adjusters.
The common mistake made here is to just tighten everything up at this point.
Instead, here’s the proper sequence to assure that the forks are aligned.
1. Temporally tighten-up the two RIGHT side axle clamp bolts so you
can torque the axle nut.
2. Put on the (left side) 28mm axle nut and torque it (63Nm.)
3. Then torque the two LEFT side clamp bolts (19Nm.)
4. Now, put the brake calipers back on using the proper torque setting
(43 Nm.)
5. Now, loosen the two RIGHT side clamp bolts.
6. Take the bike off the paddock stand, and bounce the suspension up
and down till you are sure that the right side fork has moved to the proper
(neutral) position along the axle. (It makes it easier to compress the
suspension if you hold the front brake on when rocking the bike forward.)
7. Once this is done, torque the two RIGHT side clamp bolts to 19Nm,
reconnect the speedometer cable, and you’re done.
-- Credit to "Shazaam" of San Diego, CA as posted on Ducati.ms
|
1. Fork seals seeping
-- Ohlins Forks Serviced, seals replaced at 6K Ohlins Seals, 12K Ohlins
seals and 15,600 with SKF Seals 2.
Front Brake Master Cylinder return port clogged
3. Info / Gouge on Setup
and Run of JP Diag - ECU Diagnostic Software |
|
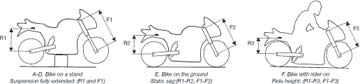
Preload (4 Sep 17)
| F1 |
138 |
R1 |
197 |
| F2 |
111 |
R2 |
181 |
| F3 |
96 |
R3 |
152 |
| |
|
Front |
Rear |
| 1-2 |
Static Sag |
27 |
16 |
| 1-3 |
Rider Sag |
42 |
45 |
Ohlins recommendations:
| |
|
Front |
Rear |
| 1-2 |
Static Sag |
15-30 |
10-20 |
| 1-3 |
With Rider |
35-50 |
25-40 |
*measurements in mm.
Fork Service:
Fork Oil Level: 85mm (with springs in)
Fork Oil: Ohlins 1309-01
Fork Spring Length measured: Left 242mm Right 242mm
Spacer Length: L 143mm R 143mm
Fork Mount Position, 244mm from lower triple (upper surface)
to top of fork cap
Preload (14 Oct 24)
| |
Front Forks |
Left |
Right |
| |
Preload turns - (in) |
12 |
12 |
| |
|
|
|
Damping (14 Oct 24)
|
3 August 2013 |
Front |
Rear |
Compression Damping
(clicks out) |
24 |
20 |
Rebound Damping
(clicks out) |
12 |
14 |
Tire Pressures: Front- 33PSI; Rear- 35PSI
Setting Ride Height: Using Motowheels tool, measured from top edge
of bracket to top edge inside of rear axle: following Section8 target
geometry, my measured R1 value was 232mm
(Section8 procedure linked below, was to measure from the top of the
carrier nut (left side rear axle nut) to the upper exhaust mounting bolt
(bracket shaped like figure 8) his target was ~ 604mm (R1) with the
eccentric at 6:00 o'clock position which per above equates to 232mm with my
Motowheels tool.
Reference Manuals:
2004 998s FE Owner's Manual - English
2004 998s FE Parts Manual -
monoposto 2002 998s
Workshop Manual
Section8 suspension setup 748/916/996/998 |